Funnel - Linux
- justinblawitz
- Oct 8, 2025
- 4 min read
Ping and Nmap the target Ip using sudo nmap -sC -sV {target Ip}

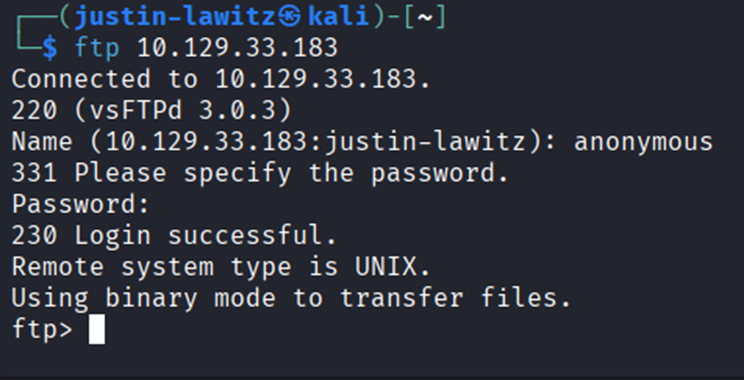
We find 2 open tcp ports, port 21/tcp open running vsftp 3.0.3, and port 22/tcp open running OpenSSH. First, we’ll try to access the FTP server using anonymous credentials by running the command ftp {target Ip} and using “anonymous” for the username and password. We can also use ftp -h to list commands.
After gaining access to the FTP server, we can enter help to check the available commands. Next use dir to list the directories. We find the mail_backup directory which we can change to using cd mail_backup and list its contents by using dir again.

We find 2 files in the mail_backup directory, we can download them using get filename for both files and exit the FTP server using the exit command.


After exiting the FTP server, we can use ls to confirm the 2 files have been downloaded and run cat welcome_28112022 to read the first file. It appears to be an email to new employees of the “funnel team” the email addresses at the top could give us a good idea of some usernames we might be able to use on the target machine.

The next file is a pdf, so instead of using cat, we must use open password_policy.pdf to read the file. The document looks to be a memo telling new employees to create a secure password. Most importantly, at the end of the pdf we find a default password, “funnel123#!#”


Knowing that an SSH server is running on the target machine, we can try to brute force a username and password combination using the credentials we found using an attack known as password spraying. This type of attack can be automated using a tool called Hydra. password spraying involves working around common countermeasures against brute-force attacks, like locking the account due to too many attempts, as the same password is sprayed across many users before another password is attempted. To install Hydra, we’ll run sudo apt-get install hydra.

First, we’ll make a txt file using touch usernames.txt and enter the names on the email addresses in the first file we found using nano usernames.txt. After entering the names, we press ctrl+X, Y, then Enter to save the name list. Finally run cat usernames.txt to confirm the names were saved

Then we’ll run hydra -L usernames.txt -p ‘funnel123#!#’ {target Ip} ssh, where -L specifies the file with the list of usernames, -p specifies we want to use one password instead of multiple, and ssh specifies the protocol we want to use for the attack. Hydra quickly finds a valid combination with the user being “Christine” and the password being the default “funnel123#!#”.

With these credentials, we can gain remote access to the machine as the user Christine using ssh christine@{target Ip}.

The next command we’ll learn about is ss, or socket statistics which can be used to check which ports are listening locally on a given machine. In this case we’ll use ss -tln, where -t displays TCP sockets, -l displays only listening sockets, and -n specifies to not try to resolve the service name.

The first column indicates the state that the socket is in, all are listening due to the -l flag. Recv-Q just displays the number of queued received packets for a given port, with Send-Q doing the same but for sent packets. Crucially, the 4th column, or Local Address: Port column displays the local address that a service is listening as well as its port (127.0.0.1 means localhost, and means that the port is only listening locally on the machine and can’t be accessed externally) (The addresses 0.0.0.0,* and [::] mean the port is listening to all interfaces, including external access, which is why we saw the FTP service on port 21 and SSH service on port 22 on the Nmap scan). By running the command again but removing the -n flag, we see port 5432 is running PostgreSQL, which is a database management system. PostgreSQL can usually be interacted with using the command psql, but when attempting to do so we find the user whose credentials we are using doesn’t have administrative privileges.

In this case we can use tunneling to access this database, tunneling involves allowing private network communications to be sent across a public network like the internet. Specifically, we’ll use local port forwarding, where a separate tunnel is created inside the existing valid SSH session that forwards network traffic from a local port on the client's machine over to the remote server's port. To do this we’ll run the command ssh -L 1234:localhost:5432 christine@{target Ip}, where -L specifies we’re using local port forwarding, and it will listen for incoming connections on the local port 1234 on our machine and localhost:5432 specifies the service we want to reach on the remote server, from the perspective of the remote server, not our local machine.

SSH has now opened a socket on our local machine on port 1234, which we can now direct traffic to that we want forwarded to port 5432 on the target machine. If we run ss again using ss -tlpn (where -p displays the process that owns the socket) we can see this new socket.

Next, we’ll install psql locally on our system in a new terminal window using sudo apt install postgresql-client.


We can next use \l to list the databases, and \c to enter a database. With the most interesting database being called “secrets”, we’ll enter it using \c secrets.

Finally, we can use \dt to list the database’s tables where we find the flag file and read it using SELECT * FROM flag; to capture the flag.


Comments